Past Blog Posts:
2 Art Projects + New Minis + Boxes & Tins FLASH SALE!
Filed under Christmas Baking Treat Box Kit, Miniatures, Rhonda Secrist Thomas, Sale, Shannon Cooper, Tutorials
Wow! We have a set of Christmas treat boxes plus a snow globe (that’s snowing bats, so not exactly Christmas themed!) plus new metal miniatures AND a FLASH SALE on all the Boxes & Tins!!
A Treat To Make, And A Place For Treats by Design Team Member Rhonda Thomas
What a big bunch of fun treat boxes by Rhonda! (Christmas gift boxes? Gifts all by themselves?) So clever how Rhonda cut a little skylight (?) in the milk carton at left to hold the tall candy canes!
 |
Beside the milk cartons (and the House Treat Box, which is also in this month’s kit) Rhonda used 2 of the 2 Inch Cube Kraft Boxes — AND all 3 of those chipboard box shapes are included in today’s FLASH SALE! (More on that below.)
Here’s some intro text from Rhonda’s blog post:
 I have SO MUCH to share with you! I have been busy in the studio with the Christmas Baking Treat Box Kit! It’s loaded with the cutest goodies, and there are some other fun boxes for decorating available as well.
Look at all of these adorable decorations I made! Not only are they full of Holiday Cheer, but they were simple to create as well.
The little Brownies from the Holiday Brownies Rubber Stamp Set, are just too fabulous! I have used this stamp set several times over the years and with a few more paper punches of patterned paper, my hand-colored friends made a perfect addition to the milk cartons.
Rhonda also used a snowman image from the Sweet Treats Collage Sheet (also in the kit) on the milk carton at far left. Plus she mixed papers from the Rejoice 8×8 Paper Pad, the Rejoice Christmas Baking Custom 12×12 Paper Set (a set of three 12″ x 12″ sheets) and the larger Rejoice 12×12 Baking Collection Kit.
|
|
|
|


Beautiful work, Rhonda!!
Note: Rhonda has a tutorial on her blog post about “icing” the roof of the House Treat Box in the center of the first photo above. Plus more info on how she covered the milk cartons (with all those odd angles) and how she cut the window in the top of one for the candy canes.
Go visit Rhonda’s blog post for more photos and those tips! And here’s her big, colorful supply list. Don’t forget to come back to see new products, another art project (!) and a new sale!
 |
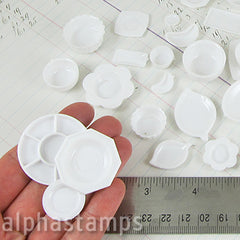
New Goodies — Christmas & Cast Metal Minis
See everything new today! (8 items, so more than these previews… including another metal mini used in Shannon’s artwork below.)
|
|
|
|
|
|
|
|


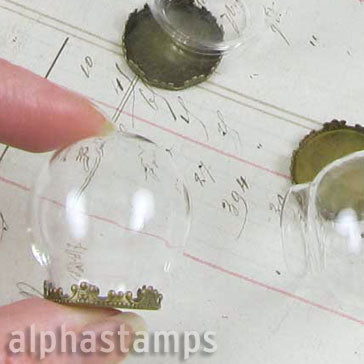
Castle Snow Globe by Shannon Cooper!
I love this! Shannon made a “working” snow globe with the new Mini Metal Castle, using the bats from the Polymer Clay Halloween Slice Mix to swirl around inside a Miniature Glass Snow Globe!
 |
Some text from Shannon’s blog post:
 I have a small obsession with miniature cast metal items. They are fun to paint, can be finished in no time (for the most part), and can be used for many different things. Most of the time I have one or two planted in a dollhouse scene, but the last one I painted ended up in a miniature glass snow globe.
There are a few flying bats in the snow globe because, hey, there’s no reason why this can’t be a vampire castle, right?
Normally, (if you aren’t a die-hard hobbyist) the prep work for painting metal miniatures is nothing more than giving it a quick scrub with a toothbrush and some dish soap before painting with acrylic paint. I have done this plenty of times without using a primer or sealant of any sort and have had no issues with chipping. Most of the finished minis aren’t handled too much anyway, so there’s no need. This little castle, however, was going to be submerged and therefore required all the steps.
The castle was cleaned as usual and afterward, a coat of white gesso was applied. I think it took three coats to completely cover. A few different colors of regular acrylic craft paint were used to detail the castle, including a final dry-brushing of black.

 I used the glass dome to cut out a polymer clay “stopper” for the snow globe. Once it was baked, it was painted and the finished castle was super glued to it. Some sprigs of green poly fiber were also glued to the base. It cured for a day or so before I coated the entire thing in several coats of matte varnish.
To finish it off, I filled the globe with distilled water and tiny splash (real measuring here) of glycerin. The glycerin helped the bats float slowly through the water. Glitter would be nice too, or any other polymer clay bits. The castle/stopper was then placed in the globe, and I applied aquarium sealant around the edge to prevent leaks. It was left upside down to dry before it was glued into the snow globe base. Mine could have used a tad more water.
Nice work, Shannon! Go visit Shannon’s blog post for more photos!
FLASH SALE: Boxes & Tins – 30% to 50% off!
Over 50 items! Click here to see ALL the sale items!
Note: anything on clearance in this big group is marked down to 50% off (like those 2 Inch Cube Kraft Boxes in Rhonda’s artwork)!
The sale ends TOMORROW night, November 8, 2019.
|
|
|
|
|
|
|
|


