Past Blog Posts:
Circus Tin Shrine Tutorial
Filed under Art Projects, Bella's Corner, Tutorials
Note: most of the links on this post no longer work, as we moved to a new Web site in 2018. But you can try searching on the same names (as links below) on the new site.
) Here’s another ahhhdorable altered tin shrine created by Alpha Stamps Design Team Member Miz Kristin Batsel! Kristin has put together a step-by-step tutorial and whether you go with the clown theme, or a completely different theme the directions will work either way!
Here’s another ahhhdorable altered tin shrine created by Alpha Stamps Design Team Member Miz Kristin Batsel! Kristin has put together a step-by-step tutorial and whether you go with the clown theme, or a completely different theme the directions will work either way!
Supplies needed:
Blank Altoids Tins
Scrapbook Paper
Collage Sheet (Tiny Circus used in this tutorial)
Wooden Spool
Tinsel
An old ink pad (dried out is good)
Black Foam Tape
E6000
Mod Podge (Matte Finish)
) Tools:
Tools:
Pliers
Xacto knife
Sponge brush
Ruler
) Getting Started:
Getting Started:
Carefully pull off the lid of the tin, and using pliers, gently rock the hinge flap back and forth until it breaks off. Save the lid for a future project. For the background of the inside, trace around the bottom of the tin onto your scrapbook paper of choice. Cut slightly within the trace lines. Place the background paper inside of the tin, and trim to fit as needed. Measure the sides of the tin, both inside and out, and cut a strip of scrapbook paper for each side. Using an old inkpad, ink around the edges of the three pieces (to antique them).
) For the back of the tin, generously coat the tin with Mod Podge, and place it the scrapbook paper you have chosen for the back. Make sure it’s adhered well. Let dry, and then carefully trim around the edge with a sharp Xacto knife. Ink around the edges of the paper. Using the Mod Podge, cover the inside and the sides of the tin, and glue your paper down, making sure you pay special attention to the corners. If desired, add some images to the outside back of the tin, and then cover the entire tin with a thin layer of Mod Podge to seal.
For the back of the tin, generously coat the tin with Mod Podge, and place it the scrapbook paper you have chosen for the back. Make sure it’s adhered well. Let dry, and then carefully trim around the edge with a sharp Xacto knife. Ink around the edges of the paper. Using the Mod Podge, cover the inside and the sides of the tin, and glue your paper down, making sure you pay special attention to the corners. If desired, add some images to the outside back of the tin, and then cover the entire tin with a thin layer of Mod Podge to seal.

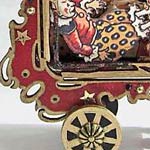
) At far left is the back of the tin, decorated. Paint the spool in a light color that matches your background. Let dry.
At far left is the back of the tin, decorated. Paint the spool in a light color that matches your background. Let dry.
)
Once your spool is dry, paint darker color accent as desired. When the paint is completely dry, you may want to lightly brush some ink on the spool to give it a bit of an aged look. If you’re going to use a collage sheet image on the top of the tin, back it with the same heavy scrapbook paper used on the tin back. Trim around the edges of the image.
)
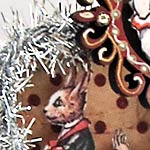
) Put a thin line of E6000 glue around the edge of the tin, and adhere the tinsel. Trim to fit. Glue on the top figure (the clown, in this case), making sure the tinsel behind helps support the figure. Choose which images you wish to use inside the tin. Figure out how they will be arranged, and then carefully cut each one out.
Put a thin line of E6000 glue around the edge of the tin, and adhere the tinsel. Trim to fit. Glue on the top figure (the clown, in this case), making sure the tinsel behind helps support the figure. Choose which images you wish to use inside the tin. Figure out how they will be arranged, and then carefully cut each one out.
Insert the figures. Put one layer of foam tape on the background figures so they stand out from the back wall of the tin. Put one or two layers of tape on the other figures depending on how much dimension you want for the scene. Gently press to make sure everything is adhered well.
) Glue the spool to the bottom center of the tin. If you wish, glue one more layer of tinsel around the front edge for a fuller effect. There you have it — a finished tin!
Glue the spool to the bottom center of the tin. If you wish, glue one more layer of tinsel around the front edge for a fuller effect. There you have it — a finished tin!
I love the circus tins Kristin creates. Beside the sample from this tutorial, click on the other tin shrine pics below to see more details. Also, here’s a link to a circus-themed tins swap we hosted in 2011.
As always, if you create an altered tin we would LOVE to see it! Email pictures of your tin to me and I’ll put them up on the Alpha Stamps Blog!