Past Blog Posts:
Stamping Gear Tutorial
Filed under Art Projects, Guest Designers, Rubber Stamps, Sale, Tutorials
 Guest Designer Kathryn Harpold has provided a quick yet thorough introduction to the new Stamping Gear Intro Set (and I think she had a blast goofing around with layering multiple stamps and colors and seeing what lacy patterns could be made).
My first reaction upon seeing the Stamping Gear Intro Set was “OOOOOohhhhh … that’s just like my old Spirograph,” which of course evoked many fond childhood memories.
After playing with it I find it to be much more sophisticated and versatile but every bit as satisfying! The basic set comes with a set of four lovely cling-mounted rubber stamps but it can be used with any of your favorites which are 2″ x 2″ or smaller. I did try some of my unmounted rubber but they need a bit of cushion in order for the image to protrude past the gear mechanism.
- Select your rubber; the image should be 2″ x 2″ or smaller in order to fit the block.
- Position the stamp on the block. It has very nice grid lines which help you line it up. They are also quite useful if you want to use two smaller stamps to create your image.
Ink your stamp. Wipe any excess off of the block if needed.
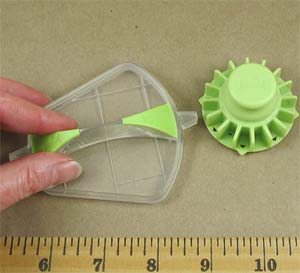
- Place the cog at the center point and hold in place lightly. It has a foam footing, which helps keep it still.
- Place the paddle gear in the cog and press.
- Re-ink your stamp and move to another slot.
- Rotate your paper, rather than just the cog to maintain even pressure and alignment.
For a tight, densely packed design use every slot, for a more open look use every other slot. Try stamping your images with alternating colors or even flipping the paddle from top to bottom to create an undulating effect. (See the photo at right using just one image from the How’s My Hair? Rubber Stamp Set… the wavy line was a happy alignment accident; and click on the photo to see a larger view.)
The Stamping Gear Intro Set can be used on any medium that you would use for “regular” stamping; paper, cloth, wood, metal, etc. I’m using mine to create a really fun image for the center of a Halloween wreath to spruce up my work space. Can’t wait to show off my adult Spirographic images!
)
Note: click the photos below to see larger images; links to the rubber stamp set used in each sample are below the photos.
)
)
)
)
)
)