Past Blog Posts:
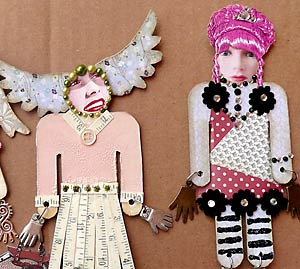
Crazy Lady Paper Dolls
Filed under Art Projects, Design Team, Paper Dolls/Theatres, Tutorials
by Teri Calia
Supply List)
- Doll Parts Collage Sheet Collage Sheet
- Get Dressed Collage Sheet
- Maya Road Chipboard Dolls (with rings removed)
- Maya Road Chipboard Wings
- Wisteria Paper Pad
- Crackle Paint-Tattered Rose
- Distress Ink Pad-Antique Linen
- Adhesive-Backed Pearls
- Adhesive-Backed Rhinestones
- Silk Ribbons
 Silk Ribbon Roses
- Violet Zig Zag Dresden
- Large Jump Rings
- Tiny Doll Buttons
- Fancy Brass Hand Charms
- Pewter Hand of Fatima Charms
- Pewter Hand Charms
- Pewter Party Hat Charm
- Pewter Be Bold Crown Charm
- Sneaker Charms
- Stickles Glitter Glue (Mermaid, Black Diamond, Fired Brick)
- Maya Road Pink & Yellow Velvet Blossoms
- Ink Blending Tool
- Miscellaneous scrapbook paper, glass glitter, cigar bands and trim, and anything else that appeals to you!
Instructions:
)
) Gather your supplies and get ready to have fun! Start by choosing your background papers and then glue your chipboard dolls and wings directly to the paper with your favorite glue. (I used regular PVC glue.) Let them dry well.
Gather your supplies and get ready to have fun! Start by choosing your background papers and then glue your chipboard dolls and wings directly to the paper with your favorite glue. (I used regular PVC glue.) Let them dry well.
Get out your sharp craft knife and a cutting mat and carefully cut around your dolls and wings with the paper side down. I cut after the parts are glued so that I get a perfect fit. If you want both sides of your dolls to have a nice finished look, now would be the time to glue paper to the flip side. You can then cut them out the same way you just did to the fronts.
) After you have finished cutting out your doll parts, you will want to “ink” the edges to give them a more finished look. I used the Distress Ink Pad in Antique Linen and the Ink Blending Tool with the foam blender. Dab ink onto the edges and let it extend over the sides a bit. Don’t worry about being too careful, as most of this will be covered over.
After you have finished cutting out your doll parts, you will want to “ink” the edges to give them a more finished look. I used the Distress Ink Pad in Antique Linen and the Ink Blending Tool with the foam blender. Dab ink onto the edges and let it extend over the sides a bit. Don’t worry about being too careful, as most of this will be covered over.
) Next you will choose which faces and or hair you want to use from the Doll Parts Collage Sheet. I like to use the chipboard wings as hair, so I only used two of the “wigs” from the collage sheet. Carefully cut out the parts you will use. I used my 1” round punch for the faces. It is a little bit smaller than the actual image, but since I usually “outline” my faces it doesn’t matter. Glue the faces to the dolls; keep in mind that the angle you glue the face down at will add character to your doll. When the faces have dried you can glue on the “hair” or “wig” of your choice. Allow the hair and wigs to dry. You are now ready to “outline” your dolls face with tiny buttons, flat back pearls or rhinestones.
Next you will choose which faces and or hair you want to use from the Doll Parts Collage Sheet. I like to use the chipboard wings as hair, so I only used two of the “wigs” from the collage sheet. Carefully cut out the parts you will use. I used my 1” round punch for the faces. It is a little bit smaller than the actual image, but since I usually “outline” my faces it doesn’t matter. Glue the faces to the dolls; keep in mind that the angle you glue the face down at will add character to your doll. When the faces have dried you can glue on the “hair” or “wig” of your choice. Allow the hair and wigs to dry. You are now ready to “outline” your dolls face with tiny buttons, flat back pearls or rhinestones.
) Once your doll has a face and you have started to see some personality, you will want to put some clothes on her. I have dressed my dolls in many different styles so you can see how easy it is to do. I’ve used glass glitter, bits of lace, ribbon and tissue paper. Old or vintage-type buttons and cigar bands are always a fun addition. Scrapbook paper comes in so many colors and styles only the sky’s the limit. The most important thing to remember is to have fun dressing your doll! After the clothes have dried, I like to add some finishing touches such as leg stripes, a belt decoration or whatever else may strike my fancy!) with Stickles Glitter Glue.
Once your doll has a face and you have started to see some personality, you will want to put some clothes on her. I have dressed my dolls in many different styles so you can see how easy it is to do. I’ve used glass glitter, bits of lace, ribbon and tissue paper. Old or vintage-type buttons and cigar bands are always a fun addition. Scrapbook paper comes in so many colors and styles only the sky’s the limit. The most important thing to remember is to have fun dressing your doll! After the clothes have dried, I like to add some finishing touches such as leg stripes, a belt decoration or whatever else may strike my fancy!) with Stickles Glitter Glue.
) When you have finished dressing your doll you will want to use a small (1/8) hole punch to make holes on her arms and legs. These are where you will attach your hand and shoe charms. I have used large jump rings to attach my charms so that I can have the holes a little higher up on the arm or leg. This will add a little more strength to the hole. You could attach eyelets to the holes if you are worried your doll may tear.
When you have finished dressing your doll you will want to use a small (1/8) hole punch to make holes on her arms and legs. These are where you will attach your hand and shoe charms. I have used large jump rings to attach my charms so that I can have the holes a little higher up on the arm or leg. This will add a little more strength to the hole. You could attach eyelets to the holes if you are worried your doll may tear.
When your doll has hands and feet or shoes, you can go back and add any other detail you think she is lacking. I added hats, a handbag, some bows and “jewelry” to my dolls because I thought they need a little something more. I know you will find just the right thing to complete your doll!
Visit the Alpha Stamps Gallery for more fabulous Paper Dolls or visit the Yahoo Group to sign up for the Paper Doll Swap!